Contributing to the Docs
How our docs are structured
Our docs are centralized inside the docs/ folder of our GitHub repository for garden. These files are synced to GitBook, our documentation publishing tool, which composes them into what users see when they navigate to https://docs.garden.io.
We have an additional class of documentation, which lives as README.md files inside each of our examples inside examples/. These files are not synced to GitBook and are intended to be discovered by our more technical users.
Our ../../gitbook.yaml file determines link redirects and the basic structure of our documentation “tree”. You can find more documentation on this file at GitBook's website.
*The README.md file at the top of the docs/ folder and the reference/* files are all auto-generated and should never be touched directly. Refer to Make your changes and open a pull request (PR) for details.
Making your first contribution
There's a few things you'll need to make your first contribution to the docs:
A local copy of the
gardenGit repository downloaded to your machine. You can find instructions in GitHub's official documentation for cloning a Git repository.Garden's developer tools installed. Our documentation explains how to install Garden's developer tools
Some basic knowledge of Git. If one or more users are contributing to the docs at the same time you are, it is likely you will need to resolve merge conflicts on the CLI or in your visual Git tool. GitHub has documentation on resolving merge conflicts using the CLI or you can use a simple, visual Git tool like Fork available for macOS and Windows. a. In case of emergencies, refer to Oh Shit, Git!?!. b. For new learners, the computer game, Oh my Git! can teach you Git.
Some form of Markdown linter. A linter enforces standards and consistency in your Markdown writing. The industry standard is
markdownlint. A markdownlint extension is available for Visual Studio Code.
Make your changes and open a pull request (PR)
Create a branch to hold your work, change any files you wish to change, save them, then commit them to your branch. Try and keep your branches focused around a specific theme. Your commits will need to be prepended with a keyword that follows the Conventional Commits specification, e.g. docs: added docs contributor page. See our documentation for a list of Conventional Commit keywords.
Before pushing your changes, run npm run build to refresh the Table of Contents contained at ../docs/README.md with any additions or changes you've made.
If you've moved or renamed files, refer to Moving or renaming files.
Now push your changes to our remote Git repository hosted on GitHub, then open a pull request and request a review from Eysi and/or worldofgeese. View our contributing guidelines for more.
Moving or renaming files
When moving or renaming files, special care must be taken to ensure any existing internal and external links continue to work.
First, use git mv when moving files. git mv is a convenience function that ensures Git can track the renaming as a file rename rather than a file deletion and a new file creation.
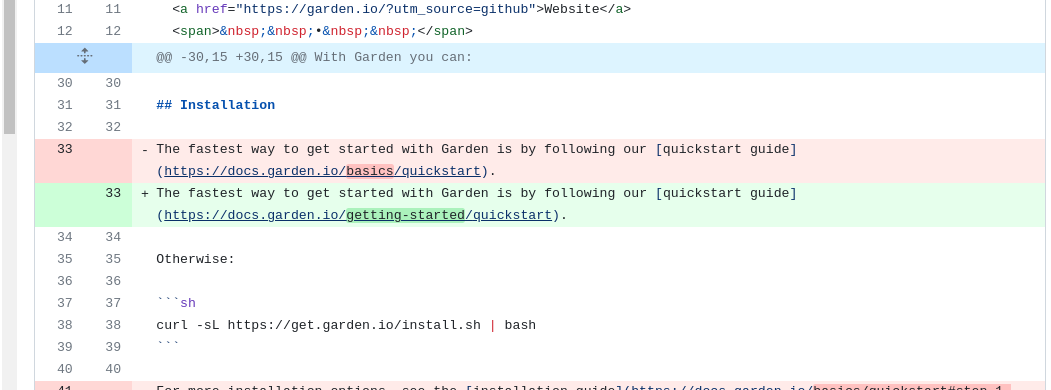
Second, update any internal and external links to point to your moved or renamed file, then update ../gitbook.yaml to redirect visitors to your new location. To illustrate this, here's a visual example of moving our Quickstart guide to a new Getting Started section.

We also need to change any existing redirects inside ../gitbook.yaml to point to our new location:
The second line, quick-start: getting-started/quickstart.md means any users visiting https://docs.garden.io/quick-start will automatically redirect to https://docs.garden.io/getting-started/quickstart.
For every file you've renamed or moved, make sure to add a new redirect in ../gitbook.yaml pointing from its old location to its new location unless you're sure no one externally has linked to it.
You'll also need to find and replace all instances of links within the garden repository to your file. An editor like Visual Studio Code will have a find and replace feature.
Do not change absolute URLs within the same pull request. Absolute URLs are links beginning with https:.
Instead, change all the relative URLs inside docs/, submit your PR, then make a new PR to update these absolute URLs. This is to avoid broken links.
Finally, run npm run build to regenerate the Table of Contents.
Absolute URLs vs relative URLs and when to use them
Use absolute URLs when you need to point to any docs from outside the docs/ folder. This is often the case when you're working in TypeScript (.ts) files. Here's an example from our ../../core/src/graph/actions.ts file that includes a URL intended for users of garden:
This URL would need to be changed or a redirect link set if the configuration-overview file were to move.
Creating a new section
To create a new section, create a folder and add a README.md file with the contents title and order e.g.
The order should correspond to its position from top to bottom in the sidebar on https://docs.garden.io and the title should be the title of the section as it appears in the sidebar. We like to use a floral-themed emoji to demarcate new sections 🌹.
Syntax
Our docs are written in the CommonMark specification of Markdown with additional “blocks” provided by GitBook, our documentation publisher.
We use the Hint and Tabs blocks from GitBook.
You'll notice YAML “front-matter” at the top of each docs page: this tells GitBook how to present our page visually and order it in any given section.
The YAML front-matter looks like this:
Markdown normally expects the first heading of any page to be a top-level, usually the title of the page, e.g. # Contributing to the Docs. However, when we specify the title of the page in the front-matter, start the page without the top-level and begin at the second-level heading, ##, as GitBook will automatically pull in the title for you.
GitBook supports a maximum of three levels of headings.
Last updated
Was this helpful?

